How long has it been since you have looked at your rigid bronchoscopy set?
Is your Bronch set or cart organized for quick access?
Is this your first time interacting with this instrumentation?
This in-service will give you the knowledge to assemble and understand the rigid bronchoscopy instrumentation.
Essential to rigid bronchoscopy is the bronch tube.
The bronch tube serves multiple purposes.
First, it serves to deliver ventilation since an endotracheal tube is not used during rigid bronchoscopy.
Second, it serves as a visualization tool into the trachea.
Third, it provides the working space to deliver instruments for operating.
As you may have noticed, all of our bronch tubes have slits in the side of the shaft.
These slits ventilate the alternative lung when the distal end of the bronch tube is introduced into either the right or left bronchus.
KARL STORZ has two styles of adult bronch tubes that provide light for visualization in two ways.
The distal illumination bronchi tube provides light through a fiber optic light carrier.
The light carrier slides down the working channel of the bronchi tube, providing light at the distal tip.
The proximal illumination bronch tube provides light through a prismatic light deflector.
This light deflector can be in a passive position or in active position. To be active the prismatic light deflector must be inserted all the way to deliver light during insertion into the patient.
Before introducing the telescope, the prismatic light deflector must be moved to the passive position by sliding it out one notch.
Again, looking down the working channel of the bronch tube: active position, passive position.
The passive position allows the introduction of a telescope to the working channel without damaging the lens of the telescope.
On the proximal end of the bronch tube, you will find the part number, the size and length of the individual bronch tube.
This information will assist you in choosing the correct bronch tube based on the size of the patient.
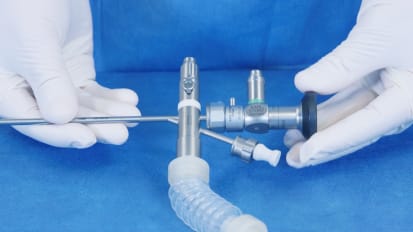
Focus your attention on the different ports of the proximal end of the bronch tube.
The largest port on the bronch tube is the working channel where instrumentation and scopes are introduced to the working space.
Rotating the tube, you find the port used for ventilation hookup. Rotating again you find the port for the prismatic light, deflector or distal illumination light fiber.
In this case, we have the prismatic light deflector.
Finally, rotating one last time you come to the port that is used for the rubber instrument guide or injection cannula.
It is important to note that an adapter must be placed on every port during use.
This needs to be a closed system to ensure ventilation flow to the patient and nothing escapes out of the proximal end of the bronch tube.
You will find that there are many adapters to close the bronch tube.
Let's go over the adapters in more detail and where each one connects to the tube.
The working channel can be closed with a variety of adapters, including the glass window plug, which allows the surgeon to look down the working channel with the naked eye.
The Rubber Telescope guide, which allows introduction of a telescope or optical forceps.
The Fluvog adapter that acts as an all-in-one adapter.
The Fluvog adapter has a movable slide that allows us to easily and quickly transition between the glass window plug, rubber telescope guide, notched lens for suction and the keyhole opening.
It is critical to be aware that the proximal and distal illumination bronch tube adapters are not interchangeable.
For example, these Fluvog adapters look similar but have different connection designs.
We strongly recommend storing these two types of tubes separately with the associated adapters to minimize confusion.
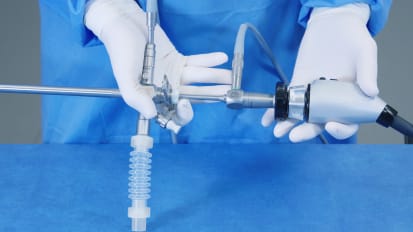
To provide optimal visualization, the proximal illumination bronchoscope has a locking bridge which locks a telescope into the working channel of the bronch tube.
Align the zero on the telescope with the notches on the bridge, connect the telescope to the bridge and lock into place.
Connect the bridge to the bronch tube.
Notice everything is securely attached.
Moving to the ventilation port, you have the racing adapter that simply slides into the port.
Moving to the light port, connect the prismatic light deflector.
Moving to the final post, connect either the injection cannula for jet ventilation, or the instrument guide to introduce suction catheters or flexible instruments.
These adapters will click into place by lining up the zeros.
Keep in mind, like our scopes, there are different lengths and diameters of the bronch tubes to match different sizes of individual patients.
There are also trachea scopes that do not have slits at the distal end because they do not need to reach into the right or left main bronchus.
There are two types of bronchoscopy forceps: non optical and optical.
The optical forceps are preferred as they allow endoscopic visualization of the tip of the forceps.
Connect the telescope to the optical forceps by lining up the zero of the telescope to the lined up notches on the locking collar.
Turn the locking collar to secure the telescope in the optical forceps.
Here are some of the different optical forceps jaw patterns offered by KARL STORZ.
The fully assembled bronch tube is a closed system.
Forceps for this system should be ready and available.
Every second counts.
This guide can aid in connecting the correct telescopes, bridges and adapters for the varying bronch tubes.
We recommend having this chart available for your bronchoscopy cases.
You should now have a good understanding of the KARL STORZ rigid bronchoscopy instrumentation.
If following this video presentation you have any further questions, please contact your local KARL STORZ Representative.