NEIL SHARMA: In this video, we discuss endoscopic mucosal resection of a colon adenoma using a novel injection solution. A 63-year-old was referred from outpatient GI services for endoscopic mucosal resection of a 2.5 centimeter adenoma found in the rectum on initial screening colonoscopy. It's important to recognize the differences between endoscopic mucosal resection and a simple lift-and-snare technique.
These steps to endoscopic mucosal resection include initial evaluation of the lesion and its borders, submucosal lifting, resection, ablation of edges, closure, and finally retrieval of the specimen along with appropriate pinning on a surgical board and orientation for pathology. Endoscopic mucosal resections are more complex endoscopic procedures which have higher risk of complications. And, therefore, should be appropriately allotted the amount of time required to perform the procedure, as well as have additional training and dialogue with the patient when appropriate.
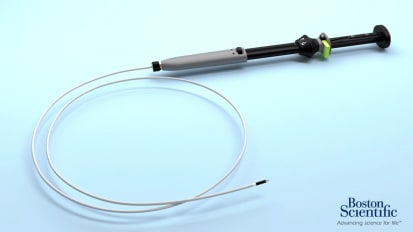
First step towards endoscopic mucosal resection involves initial assessment of the lesion, its Paris classification, and borders. Borders can be better assessed with chromoendoscopy or narrow-band imaging, as seen here. This lesion is a Paris classification 1S and has a pit pattern consistent with tubular adenoma. We opted to use the new ORISE Boston Scientific solution. This solution has a higher viscosity and has a recognizable blue tint and comes preloaded in a syringe.
Submucosal injection is perhaps the most underappreciated skill necessary to perform adequate endoscopic mucosal resection. Here, we see a 23-gauge needle. The nurse begins to inject the fluid prior to the needle being passed into the lesion. We're demonstrating here a process we call dynamic injection, where the needle, which has fluid already coming out prior to insertion into the adenoma, is passed forcefully into the adenoma and then slowly withdrawn until we start to see some rising of the lesion. Now, we know we're in the appropriate plane.
It's important to make sure we do not inject too deep to cause potential peritonitis or too superficial to cause mucosal blebs. Choosing where to inject is as important as the process of dynamic injection and injecting into the appropriate plane. We don't want to over-inject a lesion. If we inject too much around the lesion, particularly for flatter lesions, such as Paris 2A or Paris 2B, we may inject too much solution, and it's difficult then to seat the snare. Therefore, it's very important to avoid over-injection in flatter lesions.
Here, we see demonstrated the adequate injection for this sessile 1S Paris class adenoma. Only two CCs of solution were required using ORISE. We now proceed to open the snare. We always choose to open the snare above the lesion and then slowly lower it using the wheels onto the lesion itself. Therefore to avoid mucosal trauma and to appropriately seat the lesion within the snare to capture enough tissue.
We shake as we go through and cut the entire lesion. The shaking allows for less cautery to be applied into the area. We leave no adenomatous tissue behind. So in this case, we see that there may be a small rim of cauterized tissue left behind that could be adenoma, and we choose to remove it.
We also then will proceed to ablate all of the clean margins. We are not ablating any adenoma. There have been at least two studies which have demonstrated a lower recurrence rate for adenoma as post-endoscopic mucosal resection with ablation. We then examine our post-ablation scar bed. Everything appears to be intact with an adequate char of haloed tissue around the mucosal resection bed.
We then proceed to the closure of the lesion. Closure of the lesion is done by the use of a single endo clip in this setting. Adenomas 1.5 to 2 centimeters have been shown to have a reduced risk of subsequent bleeding post-resection with the use of endo clips.
The next step involves specimen retrieval. It's very important to try to keep the specimen intact as much as possible. This is particularly true for patients who may have dysplastic lesions. As high-grade dysplasia or carcinoma in situ, depending upon which pathologic classification scheme is being used locally, would then prove that the patient does not need to go on for subsequent hemicolectomy.
Here, you can see the lesion post-resection. Another very important aspect of endoscopic mucosal resection is appropriate orientation and working with your pathologists after specimens have been retrieved to place them in the appropriate way. So that they can be sectioned and further examined to look at the depth of invasion, should the lesion have focuses of carcinoma. Our local pathologists ask us to use [AUDIO OUT] and to place saline on top of the specimen in order to continue its consistency, so that it can be further sectioned down by the pathology technicians.
We flatten the lesion here and place pins. This also gives a better estimate of size of the lesion and orient the lesion, cut side up, for subsequent pathologic evaluation. With endoscopic mucosal resection, we do not suction the lesion up, as we would with the standard polypectomy specimen. Understanding how to inject electrocautery settings for resection and working closely with your pathologists are all some of the subtle details required to develop a successful endoscopic mucosal resection program. We hope that this video will allow you to go forward as you continue to develop the tools and skills necessary to have a successful program of your own.