Chapters
Transcript
SPEAKER 1: OK. Good morning. Over here, we have a Submucosal Tunneling Endoscopic Resection, a STER, for an esophageal GIST. So this is a 68-year-old gentleman in excellent health. He's actually a cardiologist from California that despite the weather finally made it here with extended detours who presents all the way here for the treatment of his esophageal GIST.
He had an endoscopy May of 2015 for reflux and was noted incidentally to have a 1.5-centimeter esophageal submucosal tumor at 33 centimeters from the incisors. He subsequently underwent an endoscopic ultrasound, which revealed a 1.6 by 1.3-centimeter subepithelial lesion in the mid-esophagus.
Pathology was done, the biopsy, which confirmed GIST spindle cells positive for CD117 and DOG-1, negative for desmin S100 without necrosis or mitotic activity. So he was told to follow it see with a repeat imaging a couple years and see how he did. In December 2017, he had an MRI which showed an increase in size of the lesion up to 2.2 by 1.2 by 2.2-- increased in about 40%.
He had a repeat EUS done last month, which showed, again, a 2.3 by 1.5-centimeter esophageal GIST. So he came all the way here for this STER procedure due to increase in size on endoscopic and radiologic surveillance. The benefits of this is that it's a minimally invasive technique, provides definitive diagnosis, rules out any malignant potential, and obviates the need for lifelong surveillance with EUS or CT.
PING-HONG ZHOU: Good afternoon.
SPEAKER 1: Good afternoon.
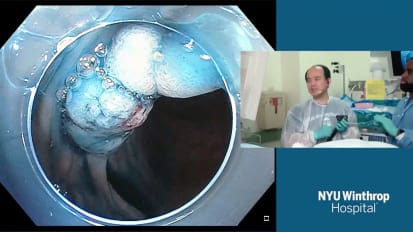
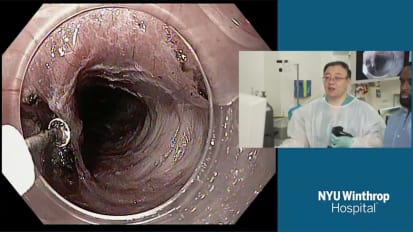
PING-HONG ZHOU: So this is a submucosal tumor about 2.3 centimeters in the lower part of the esophagus. The lesion was about 35 centimeters from the incisors. So although this lesion was originated from the muscle layer, we can remove this lesion with this technique directly. But after EST, there will be a huge defect in the esophageal wall.
So sometimes, it's difficult to close such a defect. So now today, we will use the STER technique, another submucosal tumor technique to remove the correlation. So at we know, the big advantage with internal endoscopy is it can maintain the mucosa's intercarotid. So in fishing, the luggage of the procedure will be very, very low.
Now, about five centimeters proximal to this tumor, I'll make a tunnel. So this is the entrance out of the tunnel. So the procedure is similar to the palm case. Now, I put the scope into the submucosal area, and this is a I-type of a hybrid knife. Inject the saline.
[BEEPING]
So with this technique, such a tunnel can be made.
SPEAKER 1: So as you're dissecting down in the tunnel, eventually, as you approach the tumor, the capsule should be pretty distinctive, as you see it in that submucosal cushion?
PING-HONG ZHOU: Yeah. So for the submucosal tumor, we will dissect the lesion or we will remove the tumor. We must along with the capture of the tumor never cut into the tumor.
As you know, the tip of the hybrid knife I-type or T-type was not isolated. Sometimes, I change it to use the IT knife to remove the lesion within the tunnel.
SPEAKER 1: So if you recall Dr. Inoue's case a few minutes ago and you look at this, you can see the striking difference between pretty normal-looking submucosal layer, that gauzy fluid-filled space, as opposed to nothing that Dr. Inoue was able to see.
PING-HONG ZHOU: This is a tumor. Can you see the tumor at 6:00?
SPEAKER 1: Right. I think we can just start to see it now. Well, it's rotated a little bit now.
PING-HONG ZHOU: I still remember it five years ago when I first attended this.
SPEAKER 1: Yeah, I remember it, too.
PING-HONG ZHOU: Yes. I picked a submucosal tumor in the upside of the esophagus. The lesion was about 4.5 centimeters.
SPEAKER 1: It was pretty impressive as you dissected it off of the aorta.
PING-HONG ZHOU: Yeah. So the lesion is very, very close in terms of cut with the bigger vessels close by. So this is a tumor.
SPEAKER 1: OK. So that was the question I had before, recognizing the tumor. The capsule's distinctive. You have all these serpiginous vessels over it.
PING-HONG ZHOU: So the tumor is located outside of the circular muscle.
SPEAKER 1: Yeah. So do you think that makes it easier? It certainly sounds like it because you can see it very nicely exposed.
PING-HONG ZHOU: So maybe I will perform the first resection with this tunnel.
[BEEPING]
I said, never cut into the muscle. Just please give me IT 2-- IT knife.
SPEAKER 2: IT knife?
PING-HONG ZHOU: IT knife.
SPEAKER 2: Again, there is some circular muscle attached to it, which you're separating.
PING-HONG ZHOU: I know I must cut the circular to explode the collagen.
IT knife-- IT knife. Yeah. Now I check the mucosa. This is the location of the tumor.
SPEAKER 1: It looks good. It looks like you're able to isolate this tumor pretty easily in the way it's presenting itself.
PING-HONG ZHOU: I hope so. Now, I change to the IT knife. Open, please.
SPEAKER 2: Open.
PING-HONG ZHOU: Change.
SPEAKER 1: So by using the IT knife, you're able to get around it deeper and kind of shell it out with a greater safety margin.
PING-HONG ZHOU: Yeah, same. Same.
SPEAKER 2: Same?
PING-HONG ZHOU: Yeah. It will make the dissection very safe.
[BEEPING]
This is the muscle.
SPEAKER 1: You can see how he can drag the ball of the IT knife along and keep his dissection plane pretty superficial and release the muscle fibers from the capsule of the tumor as he's working around the margins of it.
[BEEPING]
PING-HONG ZHOU: See the bleeding? Where is the bleeding? Here? That?
Here is a vessel.
[BEEPING]
So the lesion is very, very deep.
[BEEPING]
SPEAKER 1: So you think you'll be able to avoid full thickness?
PING-HONG ZHOU: So I want to keep it lodged to the muscle. So I just cut the surrounding tissue.
[BEEPING]
SPEAKER 1: He makes this look so easy, huh, just like it's--
PING-HONG ZHOU: So here, a bigger vessel is-- I want to flush this one to check. coag grasper, please. coag grasper.
Where is the bleeding coming from? Open, please. Where is the vessel?
Uh-huh. Where? Uh-huh. So the working channel with this cut is 2.8.
So for this, we always use a 3.2 scope. So close, please.
SPEAKER 2: Close.
PING-HONG ZHOU: When we inserted the instrument, the suction was not good for the small channel. Where is the bleeding?
SPEAKER 1: OK. So you're using a single-channel therapeutic scope.
PING-HONG ZHOU: Yeah. Yes. And now the suction is not very good.
Open. Open. Maybe here. Close.
SPEAKER 2: Close.
PING-HONG ZHOU: Close it.
SPEAKER 2: Mm-hm.
PING-HONG ZHOU: OK. Open.
Is that bleeding coming from the tumor? Ah, here. You can see it? The vessel, close it. Close.
SPEAKER 2: Close.
PING-HONG ZHOU: So I just use the tip of the forcep to touch the coagulated. Cut. OK.
IT knife-- IT knife. So the tumor was very, very deep.
This tumor looks like a GIST because we find many, many vessels surrounding the tumor. OK. Open.
[BEEPING]
SPEAKER 1: I think you're going to be able to leave the muscle layer intact here. It's really looking like that.
PING-HONG ZHOU: So the tumor is very, very close to the muscle. I use a cap to explode the tumor.
[BEEPING]
The four-second this-- you cannot see the longitudinal muscle now.
[BEEPING]
SPEAKER 1: You're right down on the--
PING-HONG ZHOU: Yeah, the vessel.
SPEAKER 1: Yep.
PING-HONG ZHOU: I calculate. Yeah.
Here's the longitudinal muscle.
SPEAKER 1: Yeah, it looks like it's going to be--
PING-HONG ZHOU: I'm about to cut in.
SPEAKER 1: Yep.
PING-HONG ZHOU: Coag grasper. There are many big vessels around the tumor.
Open, please.
SPEAKER 2: Open.
PING-HONG ZHOU: Open, please. Close.
SPEAKER 2: Close?
PING-HONG ZHOU: Yes. Open. Close, please. OK. Open.
SPEAKER 2: Open.
PING-HONG ZHOU: OK. IT knife.
SPEAKER 1: Well, there's not very much holding it in place now.
PING-HONG ZHOU: So originally, I wanted to preserve the longitudinal muscle. But now, I find it's impossible.
Open, please.
SPEAKER 2: Open.
[BEEPING]
SPEAKER 1: So with this size of a full-thickness defect that you'll eventually create as you get the last part of the tumor, are there any precautions you're concerned about insofar as pneumothorax, pneumomediastinum? Do you consider putting a prophylactic chest tube in or something like this?
PING-HONG ZHOU: Mm-hm. So this is the base of the tumor. You can see I just dissected the lesion around the capsule of the tumor.
Wow, very huge. This is the muscle affiliated to the tumor.
[BEEPING]
There are still some muscles here in this area.
[BEEPING]
Almost finished my work. And now, I use a snare.
SPEAKER 2: You want a snare?
PING-HONG ZHOU: Yeah, to catch--
SPEAKER 2: What size--
PING-HONG ZHOU: To catch the tumor outside of the tunnel-- snare.
Open, please. Close. You got it?
SPEAKER 2: Yeah.
PING-HONG ZHOU: OK.
SPEAKER 2: I got it.
PING-HONG ZHOU: A little bit tight, tight-- a little bit tight. OK. Yeah. Hey.
SPEAKER 2: It slipped off.
PING-HONG ZHOU: Slip. Open, please, the entrance of our tunnel. Close.
Open. Close slowly. You've got it.
SPEAKER 2: Yeah, it keeps sliding.
PING-HONG ZHOU: Open, please. Got it? Tight-- a little bit tight.
SPEAKER 1: So a question came up as to why he used the IT as opposed to the IT 2.
PING-HONG ZHOU: It comes out. Release.
SPEAKER 1: That's great.
PING-HONG ZHOU: OK.
SPEAKER 1: Nice job.
PING-HONG ZHOU: Thank you, sir.
This is the tumor. So the tumor was dissected. It was blocked with surrounding muscle-- so coag grasp.
SPEAKER 1: Do you have any specific preference of using IT versus IT 2 for this particular type of case?
PING-HONG ZHOU: I always use IT 2. So if the fibers is with some thicker vessels, so with IT 2, it's very safe. We back it up dissection-- a coag grasp. Very safe-- you don't worry about the injury to the wider organs.
So what do you do? You adjust the dissection around the lesion's capsule. So I never worry about the organs around the tumor.
So the working channel is too small, so the suction was not good. You see? Suction was not so--
SPEAKER 2: Take it out?
PING-HONG ZHOU: So no, no, no. Suction was not good.
I must check if there's any bleeding within the tunnel. It seems no bleeding now-- no suction. No suction.
SPEAKER 1: That looks pretty dry. Could you give us another view of the defect where the tumor was?
PING-HONG ZHOU: Defect? No suction-- there seems no suction. Can you check it?
Seems no suction. Not good.
Is it bleeding? Six o'clock Forceps. 06:00, the bleeding, the center of the mesh.
Open. Close. Close. Open. Close. OK.
No bleeding. There is a defect, muscle defect. Actually, this is the real full significant section where there is a tunnel.
Open, please.
SPEAKER 2: Open.
PING-HONG ZHOU: Close.
SPEAKER 2: Close.
PING-HONG ZHOU: Open.
OK. Clip.
SPEAKER 2: Clip or--
PING-HONG ZHOU: Yeah. Clip. Clip. Clip.
Clip. So this is where I close a clip of to close the entrance of the tunnel. So the tunnel and the mucosa were very safe. There is no possibility of a post-procedure blockage or infection.
Recheck the tunnel. The tunnel looks very clean.
SPEAKER 1: Yes, it looks dry. We're going to switch to Stavros. Thank you very much for this outstanding and expedient excision of a hair-raising tumor in the esophageal wall. Good job.
PING-HONG ZHOU: Thanks.
[NON-ENGLISH SPEECH]
STAVROS: OK. So here we go.
SPEAKER 1: All right. We've been waiting for this. So we have a pulley.
STAVROS: We deployed a pulley. Very simple-- we took the lower state, grabbed this wall, and then grabbed this edge here and then brought it out the mouth. And we just have it on gravity.
It's like a 15-gram tension here. I have it. We just put a clamp on the suture and have it hanging on gravity. OK?
Now, you see this is pulling it on the side where gravity would have made it difficult, the side of the greater curvature. That's what we decided to use the tension.
The other side, probably gravity will help us eventually as the tumor starts rolling towards the greater curvature. Now, this is the scary stuff about the FTR. So this is a big artery with a vein behind it.
SPEAKER 1: Yeah, that's a really big one.
SPEAKER 2: That could be a 1 and 1/2-millimeter artery-- can see how thick and muscular the wall is. So it's feeding the tumor.
So what do you think, Chris, about this one? I have the big coag grasper, but this is the type of artery that can cause big trouble.
SPEAKER 1: Yeah. That's exactly what I was going to say. Somebody yelled out. You could actually throw a stitch around it and ligate it. That's one option. You could put a clip above and below it and then do your coagulation, even though the clips are not edge to edge.
There's a space in between them. But you might be able to block off some of the flow. You can make a real good argument here to throw a stitch around it and just cinch it and take care of it that way.
STAVROS: Try a stitch, but then I'll have to cut it. You think that stitch is going to ligate it?
SPEAKER 1: You'd have to ligate it. Yeah, ligate it and then cut it. All right. So you don't like that idea.
STAVROS: Yeah, a lot of things can go wrong, like it tearing into the vessel.
SPEAKER 1: It's done manually as opposed to close-up and magnified endoscopically.
STAVROS: And the surgeons usually grab things like fat around when they do the ligation. I'm going to be catching a few fibers of muscle that are perpendicular to each other.
SPEAKER 1: Right. No, I get it, and you've got tension on it, too.
STAVROS: Yeah, big tension. The whole tumor's pulling on it.
SPEAKER 1: So you're putting down a coag grasper, and you're going to sit on it for a while.
STAVROS: My fear is that if it tears and it's still bleeding, the side in the muscle's going to retract, potentially even outside the wall of the stomach. See there how elastic it is? It could just pull through the muscle there. Yeah.
SPEAKER 1: Well, first of all, what are you putting down the scope so we can get a good size measurement?
STAVROS: Well, the coag grasper.
SPEAKER 1: All right.
STAVROS: But let's see what this looks like next to the coag grasper.
There you go. So what's that size? Yeah, the opening is, what, five millimeters on this? What's the opening?
It is five millimeters, right? So it could be two, maybe one and a half.
SPEAKER 1: Yeah. Well, you've coagulated those--
STAVROS: I'm going to coagulate as far away from the muscle as possible.
SPEAKER 1: Exactly.
STAVROS: Even if it retracts, yeah, the opening is five millimeters on this, one, two-- yeah. So the opening is five millimeters. And you can see there it's about two, I think.
SPEAKER 1: Close it on it up by the tumor and sit on it and make sure you got it all.
STAVROS: OK. You have to bring the orientation perfect. OK. [INAUDIBLE]. And then--
SPEAKER 1: Really grab that--
STAVROS: Right into the wall. OK. Close.
OK. Hopefully, we have the whole side to side coagulated. OK, here we go. So we are effect 580 watts, the usual.
SPEAKER 1: Yeah, take your time.
STAVROS: Yeah. And we can monitor the impedance-- still juicy. I don't know if you can see what we're watching. We're watching this column here that shows how much the tissue's conducting. So it's the current going through, right? You see this column right here?
So watch what happens. Once the tissue is fully dessicated, this should come to zero. So here we go. See, now it's still very juicy. [INAUDIBLE] what's out.
See, now it's at zero, all the way down to zero.
SPEAKER 1: Yeah. It looks like you've cooked it pretty nicely.
STAVROS: Yeah. So it's not [INAUDIBLE]. So open. So it still doesn't look like I can cut it.
SPEAKER 1: I agree.
STAVROS: It's all flattened out, but there's lumen in there. So I'm going to go right next to it and do it again, all right?
SPEAKER 1: Yeah. Do it right next to it.
STAVROS: Close there. Close. Close. Close. Close really tight, right?
A thing you have to go when you coagulate so much is the tissue gets stuck to the coag grasper. So when you open, it can just rip the vessel. So how are we doing with our column there?
So it's again down to zero. Open. Carefully, carefully open. Open very slow, slow. It doesn't want to open. There you go. We can go again near the tumor here.
SPEAKER 2: Open?
STAVROS: Yeah, open. OK. Close. I hope there aren't a lot more of these vessels because we need the ligature.
SPEAKER 1: Yeah, you're probably at the max capability of this device.
STAVROS: OK. No contact not at all anymore-- open. Still very thick-- still very thick.
SPEAKER 1: Do you want to put a clip down at the base on the muscle side?
STAVROS: Yeah. At this point, yeah, that could be also helpful. So let's put a clip to kind of compress the base of it. OK. So give me the resolution here. I'm going to put the clip right there at the base. Obviously, the clip has a gap in between the arms.
SPEAKER 1: Right. So you're going to have to gather a lot of tissue with it.
STAVROS: Exactly. You can't just catch the vessel because it's not like the surgical vascular clips. We need to cut the surrounding tissue, as well. Open. Did you Pam it? What?
SPEAKER 2: No. No.
STAVROS: It's a straight scope. Yeah, I can't rotate it.
We are very liberal with using Pam. So we Pam this clip on a straight scope. I can't rotate it. So Pam-- it's too lubricated, OK. Let's go.
OK. Let's try to compress it like that. So close very slowly. Don't tear the muscle. Slowly. Let the muscle come, OK?
Close. Close. Close. Close. OK. It's good.
OK. Go for it. And open very slowly. Open very slowly. OK. There we go.
So we coagulated it. We clipped its base. I don't know. We did whatever we could. Now, it still doesn't look safe to cut, however.
SPEAKER 1: No, I would coagulate it again.
STAVROS: Maybe-- yeah. OK, more coagulation. Professor Joe is here. So Professor Joe, we encountered on this EFTR-- it's progressing quite well for an EFTR-- a big vessel penetrating the muscle there about two millimeters. We coagulated it twice in two different areas near the tumor until there was no conduction.
But there still are robust vascular lumen, I think. So now we clipped it at the base to further decrease the flow there. I'm not sure if it's completely compressing that clip. Oh, hello. OK.
So this is what we coagulated there. I think if I cut this, it's going to start spurting. So let's try to-- sometimes, you can use the forceps like this to really compress the lumen. So I'm putting a lot of force on that vessel to coag the lumen. And now hopefully with a clip reducing the flow, there's less heat sink.
So we still have a little bit of conduction. It's not at zero. OK. Ideally, eventually, the forceps should go through it. I don't know. Let's do another one.
OK. I think I can try to cut now. Interestingly, this is not from the greater curvature where I thought most of the vessels would be. This is in the middle of the posterior wall. The vessels tend to be on the two curvatures, so this is on the wrong side for that.
This is stuck there. OK. Open.
SPEAKER 1: So are you going to continue your dissection now?
STAVROS: Yes.
I have a lot of water.
Clean a little. I've got all this coagulation stuck to the cup.
OK.
OK. I have one.
SPEAKER 1: So you're going to go after this pedicle there and try to open that up.
STAVROS: I'm going to try to cut this, and I'm going to do it with spray. This vessel has been treated every possible way. OK. I think we went through it now.
OK. See, this is another area where the snare's going to help us. See, this mucosal flap has nothing to do with a tumor and is making my life difficult, especially with a clip now in the middle. So I'm just going to get rid of it.
OK. Open.
SPEAKER 1: So Stavros, a question came up about the value of possibly using epinephrine prior to the coagulation. Well, I'll let you answer it, and then I'll give you my opinion, too, or whatever.
STAVROS: Yeah. I'm not sure. I got away from using it when I started doing POEM because there were some reports of the muscosal necrosin, and then you lose your tunnel protection-- close-- and that happening in a delayed fashion, which is even worse, maybe one of the patients on a diet or liquids.
So anyways, then my thinking was yeah, it decreases bleeding from some vessels. But yeah, it wouldn't really stop bleeding from such a vessel if you cut it. It could stop the bleeding from capillaries if your incision veers off to the mucosa, make your mucosa a little more clean-looking when you're doing the circumference incision, Once you add experience, I think utility diminishes.
SPEAKER 1: Yeah. I think once you have a vessel as well exposed as this, it's probably I think a little benefit with an injection of epinephrine, unless you're going to inject it into the vessel wall, not the vessel lumen. Probably low value would be my take on that.
STAVROS: So this is-- OK. Let's start from here-- no, from here. OK. Open. OK.
Start closing that. No. Close.
SPEAKER 1: OK. This is a distraction question. Are we aware of anybody lavaging the tunnels in POEM with any bactericidal material, whether it's povidone-iodine or an antibiotic solution? That's a question that came up.
STAVROS: Yes, we do. No, it came up with this so-called magic solution. At the end of the POEM, they give 20 cc's if azithromycin. I'm not sure if Harold is still doing it. We have to ask him.
SPEAKER 1: Yeah, we'll have to ask him.
STAVROS: But the group from Prague looked I think retrospectively-- or I think there may even be a randomized study looking at this I think it was retrospectively, like using it versus not using it. And they found no difference in complications. But interestingly, they found some biochemical or inflammatory mediator kind of difference. I think there was a statistically significant difference-- very interesting-- in CRP or the level of the WBC after POEM.
They said there was a study. I didn't expect. I'm like, they're studying whether azithromycin makes a difference? How do you expect to see an effect? It sounds fairly harmless either way. But they found a difference that was statistically significant in either CRP or CBC. So it may result in less stimulation.
I don't know. I didn't expect to see any major difference. I've never used it, and I still don't use it. But there is a study looking at this. What do you think from a NOTES perspective?
SPEAKER 1: NOTES has pretty clearly established that it's not really effective to do that. Either lavage the lumen ahead of time before you exit the bowel wall and as well as clean up afterwards when you're done. So I would transfer that to POEM, as well. It's probably unnecessary.
STAVROS: I come, and I clean up this.
SPEAKER 1: But I see a lot of mediastinal infections or abscesses with POEM.
STAVROS: OK. See, I cleaned out the sets here, which will be important if we get the full thickness soon.
So I clean up a little more in the back. OK. Let's do it here. Open.
SPEAKER 1: So as he's cleaning up, also with POEM, when you see an infectious complication, it's usually from a mucosal injury. And it's a delayed presentation. So I think it'd be unlikely if you lavaged before, after, or during the POEM procedure, close things up, and then several days later, there's a mucosal injury that becomes a fistula. And it's probably all that lavage and antibiotics that you'd washed with are not doing anything at that point in time.
OK. So you're debulking the surrounding mucosa that's in the way of your dissection.
STAVROS: Right, because I want to have a very good understanding of where the tumor is. So I'm removing some of the mucosa. Open. So we have a good clean indication of where to go around the capsule. Close.
OK. Now that's nice and clean here. Let's move the stuff out of there.
OK. So now we can continue. It's coming along. The traction is helping. See, the wall is pulled all the way to the tumor. So as we free the tumor, we get less and less traction but still working very nicely, as you can see, pulling it hopefully away from the pancreas and the splenic vessels.
SPEAKER 1: If you distend the stomach, will it pull it up more?
STAVROS: Actually, yes. Yes, it does. Let me distend it a little more. Well, actually, it's pretty distended. I think we've freed enough tumor that it tightened top on our slack there. So let's continue.
See, that's why with the FTR, doing the retroflex dissection is not as convenient as doing the forward one. See, now here, it's difficult to see where the tumor. Here, I can see the capsule, so I'm going to focus here for now. Clip is a little bit in the way.
SPEAKER 1: Is there a role for IT knife here?
STAVROS: I say Dr. Joe would say yes. But the IT knife, the problem is you hook and cut. And I don't think you can as precisely see what you're cutting as with this very precise layer by layer technique proximal to this one. Plus, you can hook a vessel like this and cut it in there.
Because of the way the technique of the IT knife works, I prefer this knife. And then when the going gets dangerous in the full thickness part, I like the hook because again, you can very precisely peel layers and look for vessels and precisely skeletonize everything you cut to make sure there's no vessel included in there.
So I'm sort of a hybrid first then hook kind of person. The IT 2 doesn't give you as much visibility and accuracy. So I'm worried about grabbing a vessel with one of the prongs of the IT.
You're talking about the IT 2, with the three prongs, the trident at the end? People have perforated the muscle with that. And guess how it can happen? If you squeeze it into the tissue, it can hook vessels. It can hook the muscle.
SPEAKER 1: I was just thinking, look at that view that you have right now. If you put the regular IT off to the right of there and just dragged it around it toward you, you'd probably get a nice clean cut.
STAVROS: Yes. It will speed things tremendously. And as I said, the IT 2 is for speeding up a dissection. But it results in a lot of coagulation, so it may screw up your dip margin. But also, it could hook-- my fear here is one of the prongs touching the splenic vein in the depths of the incision because now I'm almost full thickness here.
You can see this is probably peritoneal cavity here, that membrane, because that's the edge of the tumor. This is splayed out muscle. So if I hook this and cut, there will be immediately peritoneal entry. That's the sphere of the capsule, and that's the muscle pulled into it.
So now I'm cutting through muscle. I'm just doing it with glacially slow speeds to be able to have full understanding of what I'm cutting. And you want to keep the full thickness back till as late in the resection as possible because once this happens and you start getting cut in the peritoneum, the tendency is to panic a little and try to speed the resection.
So I tried to have it all the way down to the muscle all around and then breech into the peritoneum. So I'm just working the edges. And then at some point, inevitably, we'll see a hole. See, these are vessels.
See, there are some red vessels in there. I don't even know what they are. If I put the IT 2 over, I would hope that the IT 2 will coagulate them because I'm not going to know what I'm cutting. But with a hybrid, I can just pick fibers and expose the vessels, make sure they are not big, and then go through them.
It definitely slows the dissection tremendously, but I think at this point, with the technique that is at this stage, safety is very important. See, there's a vessel there that I precisely isolated-- not quite as big as the other one but maybe not something I should use the knife on.
So this is it here. So let's use the coag grasper. That might be half a millimeter artery there on the tension.
Now, the usual-- let's go. Did you brush it?
SPEAKER 2: Yeah.
STAVROS: OK. You have to remember to brush the coag grasper because if you leave the coagulate on, you think you're coagulating, but the metal is all covered by non-conducting tissue.
OK. Open. The left-- right there. Go. Close.
Am I at zero?
SPEAKER 2: Yep. That was it.
STAVROS: OK. With the small ones, you can finish with endo cut to cut through the coagulated vessel. But beware this could cause a bleed. OK. So this is our margin here. It's nice. There's some small vessel oozing here.
OK. So see, I still have successfully not done a perforation. But if I cut here, for example, next stop will be outside. So OK. So I can begin to see the capsule very nicely.
See? And the traction is helping. I think it's clearly bringing the tumor intralumenally.
SPEAKER 1: Oh, yeah. It's really doing a very nice job.
STAVROS: So I feel very safe about this traction pulling it.
Open. And this-- no.
SPEAKER 1: Right. So the question was, how is the traction pulley created? You put a bite in the gastric wall opposite the tumor and then onto the surface of the tumor and then--
[WHISTLE]
Out the mouth. You could certainly go the other way, as well.
STAVROS: See, I'm cutting really layer by layer because I don't want any vessels hiding in there. And they definitely could be hiding in there, causing a bloodbath.
OK. Sounds good. So you'll be moving.
SPEAKER 1: Stavros, we're going to get the history on the case in room three right now, OK?
STAVROS: OK. Looking good, yeah?
That's going to be big. I don't think this is going to come out the mouth. Yeah?
SPEAKER 3: Are you OK?
SPEAKER 4: Go, dude.
SPEAKER 1: You're good. You can start talking.
SPEAKER 5: All right. OK. The next case is going to be a submucosal tunneling endoscopic resection for an esophageal leiomyoma. This is a 70-year-old woman with a history of breast cancer, status post-bilateral mastectomy, no chemo or radiation, who presents for treatment of an esophageal leiomyoma.
Patient underwent upper endoscopy for further evaluation of progressively worsening dysphasia in September 2017 and was noted to have an incidental esophageal submucosal tumor. So this is an endoscopic image of a two-centimeter non-obstructing hemi-circumferential oval lesion at 25 centimeters from the incisors.
This is a CAT scan of the chest with IV contrast. That was done in September 2017, showing a 2.1 by 1.8-centimeter submucosal mass in the mid-esophagus at the level of the carina. These are some other images from that CAT scan.
So EUS showed a two-centimeter hypoechoic lesion originating from the muscularis propria. FNA was strongly positive for desmin, weakly positive for SMA, and negative for DOG1, Cd4, S110, and pancytokeratin, consistent with leiomyoma.
The plan is for a submucosal tunneled endoscopic resection due to worsening dysphasia. The benefits are minimally invasive technique, it provides definitive diagnosis, it rules out malignant potential, and obviates the need for lifelong EUS or CT surveillance.
HARUHIRO INOUE: Yes. So thank you very much for your introduction. So this patient is the leiomyoma biopsy program. So two more like this are located at 24 or 25 centimeters from the patient's teeth. So we back up almost five centimeters and then the first injection. It's a total resect procedure Dr. Joe demonstrated in a previous case.
So in his case, a tumor was located at the 7 o'clock direction. But in this case, 4 o'clock direction in Dr. Joe's case-- but this case is a tumor located at the 9 o'clock. It's very typical, a very common area of the leiomyoma of the esophagus.
OK. Now I'm inserting the injecting needle. OK. Wait a moment. OK, hopefully coming soon. OK.
OK. Just wait. OK. OK. So needle out.
SPEAKER 2: Needle out.
HARUHIRO INOUE: OK. So injection point is five centimeters proximal from the lesion. OK. This is the area. I think it's OK. OK. OK. Inject--
SPEAKER 2: 1, 2, 3, 4, 5, 6.
HARUHIRO INOUE: OK. Thank you. So after confirming the lifting of the mucosa, so now I need something--
SPEAKER 1: Haru, we're going to switch to Stavros real quickly, OK.
HARUHIRO INOUE: Yeah. Of course, yes.
SPEAKER 1: Room five.
STAVROS: Just for a second. OK. I just want to tell you that a breach has occurred. So here we are. OK.
So now I'm going to switch to the hook knife and carefully dissect around, following my mucosal incision as a guide to cut the muscle. Now, obviously, we have to watch the air, watch the fluid, watch everything, and be relatively expeditious.
SPEAKER 1: Yeah. You think you have a thin enough margin that you'll be able to pick out vessels and not accidentally slice them?
STAVROS: Yeah. No, no. With a hook knife, I'm going to pick individual fibers and dissect them.
SPEAKER 1: OK.
STAVROS: They're very safe, OK? But you can come in 10, 15 minutes to see the outside surface of the tumor and how the myotome is progressing. OK. Because how are we starting? Just have him start and then come back, I guess.
HARUHIRO INOUE: Yes, Now we are putting the mucosal incision and the dissection of the submucosal fibers.
[BEEPING]
OK. And then try to get in the space. OK. That patient is a little bit moving, so wait a moment. OK. So this is the mucosa.
So we have to dissect a little bit. OK-- patient bucking a little bit. OK. Wait a moment.
Now, you can see the bottom of the cutting end. OK. Anyway, we get in a space.
OK. OK. We are coming back. OK. Back up a little bit.
OK. Now hopefully, we are in the space. Not yet-- OK, dissect a little bit.
[BEEPING]
This is a submucosal dissection. OK. Creating a space-- and back up a little bit.
OK. Hopefully, we can get in our space with the angulation a little bit back and forth. And then now we are in the space.
OK. OK. So it's OK. Injection, please. OK. Injection.
SPEAKER 2: Injecting 1, 2. Open a little bit. Yep. Going, going-- injecting.
HARUHIRO INOUE: OK. OK.
SPEAKER 2: Injecting.
HARUHIRO INOUE: Keep injecting. OK, thank you.
SPEAKER 2: Pull out.
HARUHIRO INOUE: OK. So now we can see much better. So this case has no fibrosis.
SPEAKER 1: Yeah, this is good. So far, so good. We've got a really nice clean-looking submucosal area, and it's opening up nicely. And I don't see any tumor capsule yet, but we're still above it.
HARUHIRO INOUE: Not yet. Go straight. Maybe this one? Not yet.
This must be a tumor capsule here. So injection, please.
SPEAKER 2: OK. Injecting. Injecting four. Injecting.
HARUHIRO INOUE: OK. Thank you. OK. Can you go out?
SPEAKER 2: Go out.
HARUHIRO INOUE: So first step is to look for the tumor itself. OK. This must be a tumor.
SPEAKER 1: Yeah, it's starting to look like a capsule coming up.
HARUHIRO INOUE: Yeah. And the first step is to dissect beyond the tumor, dissect-- there is bleeding.
Well, it's OK. Ah, it's OK. So anyway, dissect beyond the surface of the tumor. That is our first step. OK. Injection.
SPEAKER 2: Injecting. Injecting. Injecting.
HARUHIRO INOUE: OK.
SPEAKER 2: Injecting.
HARUHIRO INOUE: OK, thank you. Now we can see the surface of the tumor. OK. So dissect the submucosal fibers.
[BEEPING]
So at this moment, so IT Nano.
SPEAKER 2: IT Nano?
SPEAKER 6: Yep, it's right there.
SPEAKER 2: IT Nano.
SPEAKER 6: All right.
HARUHIRO INOUE: OK. Now we can see the surface of the tumor very well. So IT Nano works very well at this moment.
Now I'm inserting the IT Nano. So IT knife, we have three types. One is the original IT knife, the second is IT 2, but this one is an IT Nano, a small one.
But it's very well. OK. Open. OK. Then we can dissect the surface of the region.
[BEEPING]
OK. We can better see. Another interesting point is that we use a very soft cap. So soft caps change their shape of the tip and then adjust very well to the space. So I prefer to use a soft cap.
[BEEPING]
OK. OK. OK.
[BEEPING]
Dissect beyond the surface of the tumor. Tumor surface is here. The first step is to be on the tumor, like this. OK.
Approach like this. OK. We found some edge and then catch their fibers and then cut it. This part is also same.
This is some muscle component. So it becomes a two-layer resection. So at this moment, we have to check again the air in separation is off and there's CO2.
OK. In this, the LEA becomes a two-layer resection, a two-later mucosal resection.
[BEEPING]
So we have already dissected the surface of the region. So we want to approach behind the tumor. OK. This is the backside of the mucosa. OK. Once again, get in a space and approach backside of the mucosa.
This is an OK border. Find the edge and approach this way step by step. OK. I'm not sure what percentage of the tumor is buried in the muscle layer. I'm not sure.
But anyway, find the edge and then cut the muscle like this and immobilize the tumor step by step. OK.
Now we are approaching behind the base of the tumor. OK. Find the edge and control the dilation of the endoscope. And affix the tissue up and then cut it.
OK. This is the muscle layer side. OK.
This is the base of the tumor, I think. So of course, most of the tumor is coming from the circular muscle layer, not the longitudinal. OK.
This is the edge of the tumor. Place the knife into the space and then cut the muscle like this. OK. So more is immobilized.
Approach to this side. OK. OK. Like this, going along the tumor.
[BEEPING]
So this soft food adjusts to space. So I prefer to use this soft one. OK. Approach this way.
Generally, when we dissect a submucosal tumor, particularly leiomyoma, there is no big base cell theoretically.
So as long as we dissect along the tumor surface, it's less breathing. So this part is tumor connecting to the circular muscle that we can dissect like this. OK.
[BEEPING]
OK. We will approach behind the tumor. OK. Yeah. Yeah. Of course.
[BEEPING]
SPEAKER 1: Haru, we're going to switch to Stavros for now, OK?
HARUHIRO INOUE: OK. OK. So like this, now we are approaching--
SPEAKER 1: It looks like we're almost done there.
STAVROS: Yeah. We're almost done, I think.
SPEAKER 1: So we're doing a little peritoneoscopy.
STAVROS: Right. So this is the outside of the tumor because remember, this protuberance that was touching this splenic vein is this little bump there. It has a little protuberance. So anyway, so this is the tumor. And now we are looking at it from the outside.
And this is the myotome on the left side, following my incision. And this is the myotome on the right side, following the incision. And I can see where the tumor ends in order to preserve intact the margins of the resection.
See, now I can also see whether there are any vessels from the outside, from the peritoneal side. So it's safer. So I've been using the hook knife to go very carefully.
So I'm putting it down. OK. Open. And we'll just clean it a little.
OK. Point it up. Point it up. It's pointing down.
Oh, maybe it's not pointing down. I don't know. Well, use a little endocut to clear the coagulate.
OK. There it is. All right. So I'm--
SPEAKER 1: So it looks like you wound up with a pretty good-sized defect, huh?
STAVROS: Oh, yeah. And I don't think this is going to come out the mouth. I'm not entirely sure. You can see the size of it. That part, that's the extralumenal portion, about 10%, 15%. This is the muscularis portion here.
And then there's all the stuff on the inside, all this. Our pathologist prefers that we leave the mucosa on because that helps her orient the two poles of the tumor because obviously, having an intact capsule on the peritoneal side is much more important than how much coagulation you used on the mucosal side.
So now, we're just going to proceed and do the two hooks from the right side and the left side and meet in the back. So now I'm going to do the left side a little, just cutting the muscle right along the mucosal circumference shell incision and keeping insufflation to a minimum and not irrigating aggressively, et cetera.
OK. So it can do this.
[BEEPING]
You can go to Inoue because he must be done by now. So you can finish that case, and then you can come back.
SPEAKER 1: Right. We'll switch to Dr. Inoue now.
HARUHIRO INOUE: Ah, yes. Yes. So welcome back-- not yet. Yes, welcome back. Welcome back.
So we have almost immobilized. First, we approach the surface of the tumor. So in this case, our mucosal incision is a little bit close to the tumor. So I think it's better to have more distance.
But anyway, so we have already dissected the surface of the tumor like this. Now we are approaching behind the tumor. And then most of the problem is mobilized. So attachment is not so-- big one.
So leiomyoma is weakened very quite often of this kind of a transition from the sacral muscle bundled to the leiomyoma. We can observe this kind of a transition quite often.
Anyway, dissect this area. And now most of the part has been mobilized. So soft, soft-- softer food is very nice to approach behind the tumor because a soft tip adjusts the narrow space very well.
OK. We can cut this one.
[BEEPING]
This is a luteum muscle, so it becomes a defect. I think I'm almost done at this moment, so we will approach the other side. And then we can confirm the-- OK. We will approach this side.
OK. I think most of the part mobilized already. Once again, same place-- and this part is already mobilized, I think. Ah, not yet-- some connection.
OK. Find the edge. OK. OK. Another attachment-- we can locate a little bit inside the tumor.
Almost done, I think. So at this moment, one of the options is suck it out. Maybe most of the tumor has been mobilized, I think.
So I need a clean lens. Wait a moment. OK.
OK. Thank you. OK.
SPEAKER 2: [INAUDIBLE]
HARUHIRO INOUE: OK. So I hope the tumor is two components, two modules. OK.
Anyway, almost done. I will try to suck it out-- not yet. Most of the part is mobilized but not yet. Some attachment remains behind the tumor, I think.
SPEAKER 2: [INAUDIBLE]
HARUHIRO INOUE: So at this moment, we may use our snare to dissect. So--
SPEAKER 2: Still like a little snare?
SPEAKER 6: Yeah. [INAUDIBLE]. Snaremaster?
SPEAKER 2: Yeah, Snaremaster.
HARUHIRO INOUE: Yeah, Snaremaster-- yellow one. So this tail end of the tumor is quite often difficult to see.
SPEAKER 1: So is your plan to put a snare around it then and pull it up, loosen it up--
HARUHIRO INOUE: Use a snare wire to dissect the connective tissue behind the tumor. So most of the part has been dissected. OK. Now we are waiting for the snare.
SPEAKER 1: So your tumor is pretty close to the mucosal entry.
HARUHIRO INOUE: Yeah, I saw. We have to keep more distance. So this is a limited attachment.
OK. Can we have an IT Nano?
SPEAKER 2: IT Nano?
HARUHIRO INOUE: We can dissect a little bit more. But--
SPEAKER 2: You want me to look for it?
SPEAKER 6: Yeah.
HARUHIRO INOUE: If it's difficult, we may use our snare for dissection. So most of the part has been already dissected.
Open. Yes, thank you. OK. OK. Thank you.
One second-- going behind the tumor. Hmm, we cannot see behind. So anyway, most of the part has been mobilized. So snare, please.
We are looking for a nice snare. so blue one is too much soft, so it's better to use a yellow one.
SPEAKER 2: Yellow one?
HARUHIRO INOUE: Do you have any kind of regular snare? We can accept any kind of regular snare.
SPEAKER 2: Yeah. 13, 27, or 30?
HARUHIRO INOUE: You have 27 or something? Yes. Yeah. Yeah. OK. Large one is OK.
OK. So wait a moment. Wait a moment. We'll come close to the-- OK-- come close to the distal end of the tumor, the place.
OK. Open. Open. Open.
OK. OK. Slowly, very slowly close. OK. Slowly close.
OK. Slowly close. OK. Very nice.
We may be OK. Close. close. Closing, closing-- closing. OK.
Open. Open. Open. Open again. OK.
Close slowly. Close slowly. Closed?
SPEAKER 2: We're closed.
HARUHIRO INOUE: OK. It looks OK. This is-- I think we have already done. OK.
This is a tumor resected. OK. Oh, like this.
OK.
SPEAKER 1: All right. Nice job. We are going to switch to Dr. Yahagi for a case presentation.
HARUHIRO INOUE: Yeah. Thank you.
SPEAKER 1: And then following that, we're going to send you all off for lunch, OK? And then you'll be spoken to by Dr. Cansevoi, and we'll go through some of the videos. OK?
HARUHIRO INOUE: Yeah. Yeah. Yeah.
SPEAKER 5: All right. Over here, we have a colon EST from Biometric.
We have a colon EST here by Dr. Yahagi. So we have a 75-year-old woman with a history of colon polyps who underwent a surveillance colonoscopy in November 2017. Of note, prior colonoscopy five years prior to that showed a two-centimeter cecal tubulovillous adenoma that was removed by endoscopic mucosal resection.
So the most recent colonoscopy she had in November showed this three-centimeter Paris 2A lesion in the cecum, possibly involving the appendiceal orifice-- picture right over here. So the patient presents now for endoscopic submucosal dissection. The benefits are it's a minimally invasive technique to assess histopathology and resect en bloc to ensure zero chance of recurrence.
NAOHISA YAHAGI: Welcome. We already checked the cecum, but I found that there is no recurrent lesion at the cecum. And actually, can you see the image of the endoscope now?
SPEAKER 1: Yes, we can.
NAOHISA YAHAGI: Yeah. Now we can see the big polyp here, but it's located at the hepatic flexure. So this isn't a remnant or recurrent region after EMR. This is just a new polyp but a little bit rushed located at the hepatic flexure. So briefly looking at the surface structure of this region, I found that most of the suspect surface structure well-preserved.
And using NBI, we can nicely check the surface structure. As you can see here, this is sinous type 2 vascular pattern. And the surface structure is completely preserved. Therefore, I think this is just a benign adenoma and not a malignant one.
But because of the big lesion size, I would like to conduct the EST to remove this region in an unbroke fashion to have precise histopathological revariation and also to prevent local recurrence after the complete resection of the tumor.
Before conducting actual EST procedure, I usually spray indigo common to enhance the surface structure and also to check the gravity according to the patient physician. Now, we can see the nice surface structure with the Indigo common dye spraying. And the spray of the Indigo common collected at the lower side according to the gravity.
So most of the lesion is located at the upper side. So this is the best position to work with. I prefer to start my procedure from the other side. If retroflexed position is bearable, I try to keep the retroflexed position from now.
It's a little bit difficult to have retroflexed position now because of the narrow room of the colon. It's almost impossible. I'll try a little bit more-- oh, still very difficult.
So in this particular situation, I found that it is very difficult to keep the retroflexed position. Therefore, I would like to approach from the anal side in a straight position and try to make a submucosal pocket to do submucosal dissection much smoother. So keeping a good location is a little bit tough in this particular case, but I'll try to do my best.
I'm going to use 1.5 DuraKnife J for my EST procedure this time. But before using the DuraKnife J, I would like to inject some solution to the submucosal area. For most of the standard EST procedure, I think that the glycerol solution is very good. Because of the hypersimilarity of glycerol solution, it stays a little bit longer than normal saline.
Glycerol solution is a very unique solution which consists of 10% glycerin, 5% fructose, and 0.9% of sodium chloride. And the similarity is nearly six times higher than normal saline. That's why it stays much longer within the submucosal area.
And I always give some blue color using indigo common inside. That makes it more easy to identify the submucosal dissection frame. OK. Open it, please.
This is an [INAUDIBLE] injection needle. And starting from the edge, carefully puncture the mucosa outside the target lesion. Injection, please.
SPEAKER 2: All right.
NAOHISA YAHAGI: OK. Could you count the volume of injection, 0.5, 1, 1.5, like this?
SPEAKER 2: 1, 1.5--
NAOHISA YAHAGI: OK, thank you because it is very important for us to recognize nice lifting sign after injecting some amount of solution because if it is not effective, it means the needle tip already penetrates through the muscle area. So we should check the nice lifting sign when we inject solution using an injection needle. OK. Injection, please.
SPEAKER 1: Just for the audience, lunch is available. So you could feel free to go get your lunch, come on back, and--
NAOHISA YAHAGI: OK. Stop it--
SPEAKER 1: Eat and watch, OK? So just as a reminder-- as you can see, some of you have already been doing that.
NAOHISA YAHAGI: A little bit more here. Injection, please.
SPEAKER 1: So he had mentioned using the glycerin solution. You can make that yourself, actually. It's just 10% glycerin. And then if you have excess solution left, you could use it as a-- good for the patients, good for your hands. In Japan, it's called "Glyciol." That's the commercial name of the product.
NAOHISA YAHAGI: Yes, that's right. And glycerol solution is very cheap. It's just 2 euros for a 200-milliliter package. OK. Injection, please. That is one of the merits of glycerol solution.
SPEAKER 2: 0.5, 1, 0.5, 1, 0.5, 1--
NAOHISA YAHAGI: OK. Stop it, please.
SPEAKER 1: Let's quickly switch to room five. Stavros is going to show us a clutch knife, a little slick device. OK. Let's see this there, big boy.
STAVROS: So there it is. So we have the situation where I'm all the way to this edge here on the myotomy all the way to this edge here. But I cannot really-- as I told you, the problem is, where is my incision in the back?
Very difficult to see-- so we're going to try to make the two meet in a less precise way by using a clutch knife, which is big and has serrated edges. So we're going to just cut across this myotomy all the way to this myotomy.
Now, if you cut with a hook knife without seeing your incision on the other side and you may end up cutting through mucosa or whatnot, things can get very thick. So the clutch knife actually compresses everything, and it facilitates things. So let's cut on this plane here. OK.
Let's do two more. So turn it this way. OK. So you can lift it and see where we're going. And this is the edge of the tumor there. So we need to maintain this plane over here.
OK. So we can cut right there and cut this close. We can coagulate initially and then use endocut and then open.
We had to relax the traction, too, because it was keeping us from flipping the polyp inside the lumen of the stomach, like you see here. See, the polyp now is all the way intralumenal, and we're cutting the back, basically. So this is where we're going to go. Close.
So we check. Close all the way. Here we go. So coagulate and then cut.
So we are making progress. It may not seem so, but we are. See, now this is the distance between the two incisions. So we're going to continue here.
Open. Put it right in there. I lift to make sure that's where we want to go. Lift, and then grab. Close all the way.
SPEAKER 1: So couldn't you do this with an IT knife?
STAVROS: Yes. It's just going to-- I'm using a lot of coagulation. It's going to char very fast, and it's hard to clean. Yeah. I don't know. But yeah, this would be ideal because now I know there are not huge vessels because I'm cutting from the peritoneal side. The biggest I can get is some big submucosal vessels.
So yeah, we could try that. But if I run away from my mucosal incision, I'm cutting mucosa also. It's going to tear a lot. This compresses everything and cuts cleaner. So they could work well here, I think, the IT 2.
So I'm lifting to make sure I'm in the right area. Close. In this difficult visibility, this works very well. See, I do a lot of coagulation first and then some endocut.
OK. So we're approaching. We are approaching. So take this out. You know what? I'm not happy.
Now the angle is not good because I'm completely on phase, so it will be hard to scissor through in this angle. So I'm going to go back to the hook knife because we are about to make the two ends meet.
Yeah, I think after we free it, maybe we can do the togs and then I can show you the suture in between the togs or something like that? I think that may work. So I'm cutting the muscle first between the two ends.
[BEEPING]
OK. And then deeper.
[BEEPING]
Take it. OK. So this is where we need to go. So we just need to deepen it now. And you see now the submucosa slowly getting exposed. So now we are cutting from the peritoneal side.
So it's muscle, then submucosa. Then hopefully we'll end up where our incision is, and we won't have to cut mucosa, as well. But I'm not sure. Open. OK.
SPEAKER 2: Do you want me to turn it the other way?
STAVROS: Yeah.
[BEEPING]
So now we're getting into the submucosa there.
[BEEPING]
There's a vessel there.
[BEEPING]
OK. So now we see the submucosa there with some vessels.
[BEEPING]
OK. Take this out.
OK, sir. I know he has been waiting, so you guys are going to switch briefly and then I guess come back to show maybe towards the end of this. Yeah.
SPEAKER 1: OK. We'll go to Dr. Inoue in room three.
HARUHIRO INOUE: Yes. So we would like to demonstrate the defect of the tumor. So like this, this is a mucosal incision, and then we get in a space. This is a defect of the tumor. So we can see a longitudinal muscle behind. And the reason why we are waiting is this one.
So this part, the tracheal bifurcation, left shoulder of the tracheal bifurcation-- so from this defect, we can see a trachea. This is a left main bronchs. This is a cartilage of the left' main bronchs, and this is our membranous portion of the left main bronchs. OK.
Just show you-- so this is a position of the [INAUDIBLE] ligament. And then we cannot see, but the left side anatomically varies the empty cartilage.
Anyway, so this is a very common position of a leiomyoma of the esophagus. Ah, this part is a little bit bleeding, so we have to coagulate the vessel like this.
So thank you very much. Just this after controls the oozing. So let me close our entry using clips.
SPEAKER 1: OK. Very good.
HARUHIRO INOUE: Yeah. Thank you.
SPEAKER 1: Thank you.
NAOHISA YAHAGI: Can you see the whole endoscope?
SPEAKER 1: OK. Yeah, we can see everything really nicely.
NAOHISA YAHAGI: Oh, good.
STAVROS: 40-- [INAUDIBLE], can you prepare the angiograph? OK. So here, so this is the final pedicle. See, the left side is free. And this is what's holding it on the right.
So I'm going to use the clutch claw again to try and grab this pedicle. Open. And turn it. So this is the final cut, really.
Turn it. OK. Open. OK.
Ah, this mucus. There. OK. Close. OK. So we're going to cut this pedicle.
[BEEPING]
And that's it now. Open.
Close. OK. So that's it.
SPEAKER 2: That's all?
STAVROS: The resection is complete. So this is the peritoneal side, and the mucosal marks, they are the other side. So there, it's in the interim now. So now, let's see the defect here. Take this out.
OK. So this is in the lumen of the stomach now. It's being held by our pulley to that wall. And now, this is the defect-- very nice. I'll try to keep the clip intralumenal, but this is the entirety of the defect. It looks very closeable.
SPEAKER 1: Yeah, it looks pretty good.
STAVROS: We just have to make sure we don't fold the ends. And these are the splenic vessels here in the intraperitoneal fat. Do you see it right there? You see the vessel underneath?
SPEAKER 1: Right.
STAVROS: Here? OK. So this is it. So the suturing, I guess you can come back or show it in lunch as we're doing it. So the suturing here should take about 10 minutes, 15 minutes, and we'll be done.
The extraction, just I don't know. What do you think? CJ, I don't know that this will come out the mouth. I'm very doubtful of this.
SPEAKER 1: I don't think it's going to come out. No, I agree with you.
STAVROS: So we may have Dr. Barkin, our other surgeon we collaborate with, do a small gastrotomy anteriorally wherever the stomach is nicely exposed and take it out intact.
The other possibility is take a snare and cut it, but that would be a shame. But it's all completely resected, OK? All right. Thanks. Let's--
NAOHISA YAHAGI: Welcome back. I would like to show you how to make a mucosal incision and how to make a submucosal dissection. Unfortunately, maneuverability of the endoscope is really, really poor, and it was impossible to keep the retroflexed position. Therefore, I would like to start the initial mucosal incision from the anal side in a straight position.
And initially, I believe we touch to the target tissue the tip of the DuraKnife. Then press the foot pedal of the cutting current in a short second. Then the knife tip is already fixed to the target tissue. So keeping the good contact to the target tissue, I can start the mucosal re-incision in a straight position.
Unfortunately, there is some peristalsis and the respiratory movement. So the endoscope tip becomes a little bit unstable. But going slowly, slowly to the upper side, I can control the tip of the DuraKnife very well. And of course, a transparent hood attached to the endoscope is very helpful to keep the good audition and also good visibility of the operating field.
So I made a partial mucosal re-incision, then quickly start the submucosal dissection within the same endoscope position. Using what I indicated, I can check the incision line here. And just tracing the same line with the coagulation current, I can open the submucosal space.
Usually, two or three times tracing with the coagulation current is good enough to open the submucosal space. Then I can quickly go to the submucosal area with the upper limit of the transparent hood. Gently catching the submucosal tissue is the tip of the DuraKnife. I usually can dissect the submucosal tissue very nicely.
And even if there is some blood vessel like this, I can continue submucosal dissection without having serious bleeding because coagulation ability of the swift coag is very good to avoid bleeding during the submucosal dissection. Now we can see this muscle area behind the submucosal area.
And in case of having some bleeding from the tiny blood vessel, we can coagulate it with the closed tip of DuraKnife. Close it, please. There is no bleeding, but there is some exposed blood vessel. Therefore, I would like to coagulate this one.
Just gentle touches are usually good enough. And for this kind of tiny blood vessel, it is also very effective to use the closed tip of a DuraKnife to coagulate it. Most of the tiny blood vessels can be easily managed with this technique.
SPEAKER 1: Dr. Yahagi, we have a question from the audience. The question is, when do you mark circumferentially around-- coag mark around a lesion? Is it just in the foregut and you don't do it in the colon?
NAOHISA YAHAGI: Yeah. It's a very important question. For the gastric region as a region, I usually put the marking of that on the lesion. But for the correct region, always the border between the healthy mucosa and the neoplastic tissue is quite clear, like this.
Therefore, we don't have to put any marking during the colorectomy procedure. But we should inject a solution which has a light blue color. Then we can easily recognize a border. Open it, please.
SPEAKER 2: Open.
NAOHISA YAHAGI: And in case of injecting-- injection, please.
SPEAKER 2: Injecting.
NAOHISA YAHAGI: In case of difficulty, I can inject the solution directly through the DuraKnife J. This is very convenient. Could you approach it?
SPEAKER 2: Sure.
NAOHISA YAHAGI: OK. This injection capability is very helpful for the colorectomy as a procedure. I would like to extend the mucosal re-incision from here to the lower side. The maneuverability becomes a little bit poor, but catching the edge, I can slowly go to the lower side.
We don't have to move fast. Just go slowly. Go slowly. That is usually good enough. And right after making an incision, I usually trace the same line using swift coag.
Just catch the edge. Then use the swift coag. It becomes a little bit blinded. I don't like a blind manner.
Oh, this is tiny massive injury. Can I have a smaller-sized endoclip?
SPEAKER 2: [INAUDIBLE] .
NAOHISA YAHAGI: Probably due to the poor maneuverability, I made a tiny hole here. But it's not a complete perforation because still there is the post-tissue located outside. But we had better to close this tiny hole before continuing my procedure. So I would like to apply endoclip.
Usually nothing happens in case of having this kind of tiny muscle damage if only the air leaks out from this kind of tiny muscle damage. So it is very important to recognize this kind of muscle damage during the procedure right after making a mistake. So I'm introducing the endoclip through the working tunnel.
SPEAKER 1: Dr. Yahagi, as you're doing that, I have a question for you.
NAOHISA YAHAGI: Yeah?
SPEAKER 1: Since you can't approach this lesion retroflexed and it is on a flexure, are there any special little techniques you use to try to expose the section plane? Do you use clips and rubber bands or any special technique?
NAOHISA YAHAGI: Yes. I think balloon-assisted over tube is quite helpful in this particular situation, in which we cannot get good maneuverability of the endoscope. And of course, as you mentioned, clips and line traction take the-- close it, please.
Clip and line traction technique is usually good. Another one, please. And also, there is another traction technique, which consisted of endoclips and a spring. That is also very helpful for the correct EST procedure.
SPEAKER 1: OK. We're going to interrupt you to have Dr. Cansevoi, who's been falling asleep in his chair, give us his presentation.
NAOHISA YAHAGI: OK.
SPEAKER 1: OK. We're going to be going to room five, and Stavros is going to demonstrate the closure of that large gastric defect.
STAVROS: Yeah.
SPEAKER 1: OK. We're watching.
STAVROS: OK. I was actually going to try pulling it out by hooking it like this, but maybe I should just leave it for the surgeon. I'm not sure. But this is the closure. You see that? It's all very nice and tight.
And so these are the edges, all the way from the right. That's the left. You have to probe it well because when the mucosa is thick and it's such a long incision, you can easily leave the edges without closure.
But it all is-- see, my metal is all the way out to there. And the incision here is where the bumper is. So it looks all good, yeah?
SPEAKER 1: So is that just one long running stitch that you placed?
STAVROS: Yes, because if you try to do interrupted with such thick mucosa, once you approximate it, finding where the rest of the edge is extremely difficult. And that's when you may end up leaving a whole segment without approximating it. So I'd rather-- it's a lot of passes, so you have to give some time for the suture to get through all that tissue and not to break it.
So it requires a little bit of massaging until you can see the metal, which is on this side here, get buried, which means that you transmitted the tension all the way through. So the metal was really sticking out for a while. I had to slowly pass the suture all the way through this, probably seven pairs, seven or eight pairs of passes.
But if you cinch it and then try to do the rest, you can't see anything. And you can end up not closing it well. But it is OK. I've inflated the stomach completely, and the [INAUDIBLE] pressure's remaining at 26.
And now we just need to remove this. I'm thinking about just going through it with an overstitch through the muscularis proper and trying to pull it down. But I don't think it's going to work. I'll let you know.
SPEAKER 1: All right. Very good. We're going to go to room one to Dr. Yahagi and his colon he has.
NAOHISA YAHAGI: Yes. Welcome back. I already nearly completed the procedure. I dissected most of the submucosal tissue from the anal side in a straight position, and this is the very last step to complete the procedure. This is the remaining tissue, and catching the edge of the remaining submucosa area, I can cut here.
[BEEPING]
OK. Then check the remaining tissue. And this is the last part to cut. Unfortunately, the maneuverability was quite poor. Therefore, it becomes a little bit dirty. But still, it's complete unbroken resection without having any tissue damage on the neoplastic tissue.
So right after the complete resection of the tumor, we should check the resection bed whether it is necessary to coagulate this kind of blood vessel or not. If we found some pulsation, we should coagulate this. So in case of finding this kind of blood vessel with pulsation, I usually apply the closed tip of the DuraKnife.
And if it is not good enough, I will switch to the four-millimeter coag grasper. So could you reduce the effect of the swift coag to 1 and also maximum voltage of 15? That's usually good enough for the coagulation of the exposed blood vessel.
SPEAKER 1: Dr. Yahagi?
NAOHISA YAHAGI: Yeah?
SPEAKER 1: In addition to coagulating the exposed vessels, will you also leave a clip over it, as well?
NAOHISA YAHAGI: In case of a very thick exposed blood vessel, I usually press the endoclip, especially in the rectum. But for the right side of the colon, usually, that area Is very thin. That's why I usually don't press an endoclip because the sharp edge of an endoclip sometimes causes secondary perforation after pressing it. So I carefully just abrade the exposed blood vessel like this. That is usually good enough.
OK. Checking another blood vessel-- here's another one. And gently touch with the closed tip of a DuraKnife. And check it. OK. I think it's good enough. Thank you very much for your kind attention.
SPEAKER 1: OK. Thank you.
Live endoscopic procedures from the 10th Annual Long Island Live Endoscopy Course, Frontiers of Endoscopic Surgery. Part two of two, morning session.
Related Videos